Search the Community
Showing results for tags 'diy'.
-
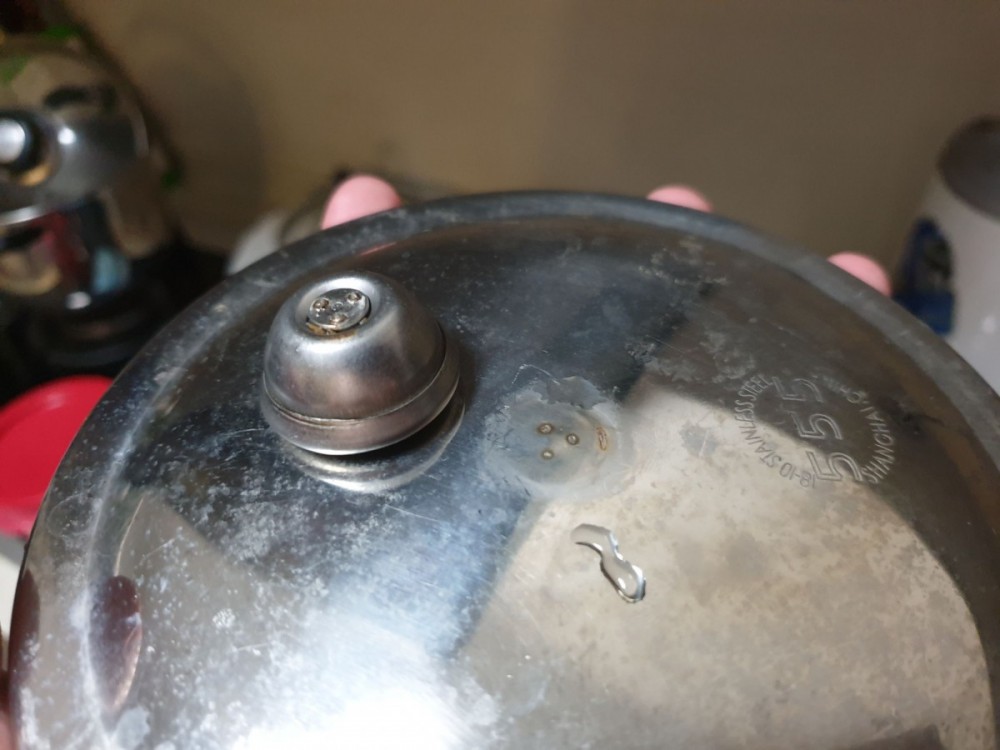
Hi guys. Our home handyman adventures are sorta scattered all round the place in different threads. Maybe can lump here under something like makan thread. Don't think this belongs to plumber thread. So I start this off. My 555 ss water container. The lid handle fell off. Would an epoxy work? Any recommended brands? Funny thing is if it's epoxyed on originally. How come got that 3 contact points?

-
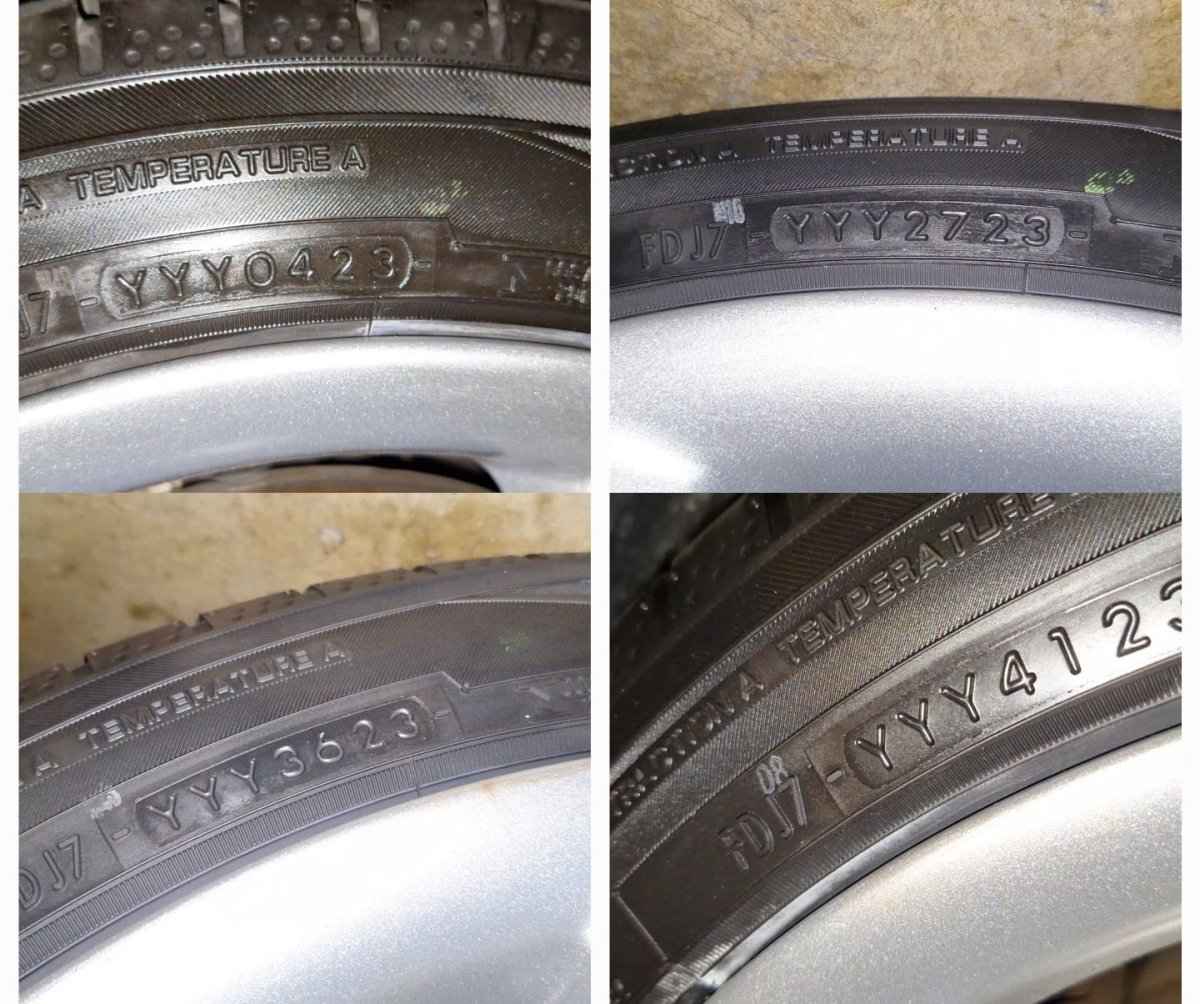
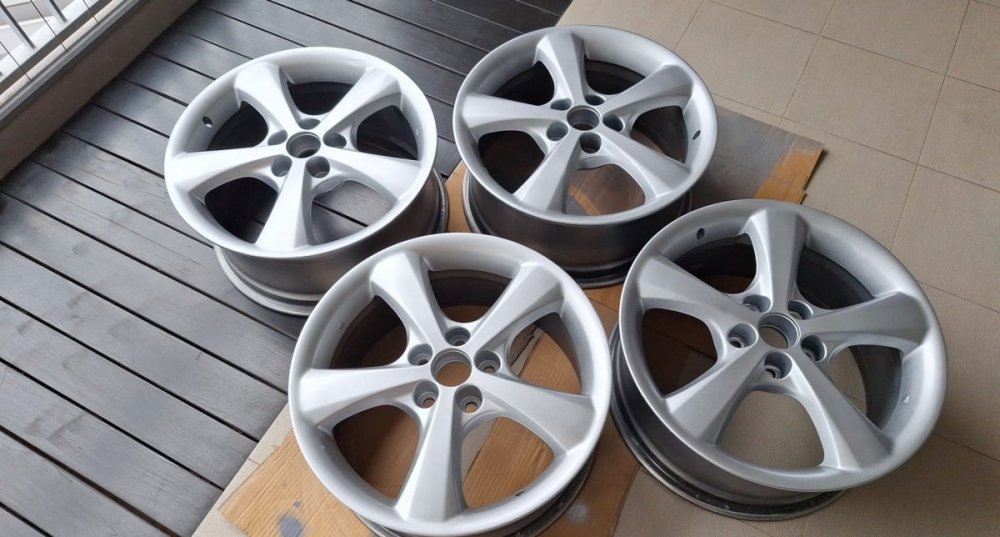
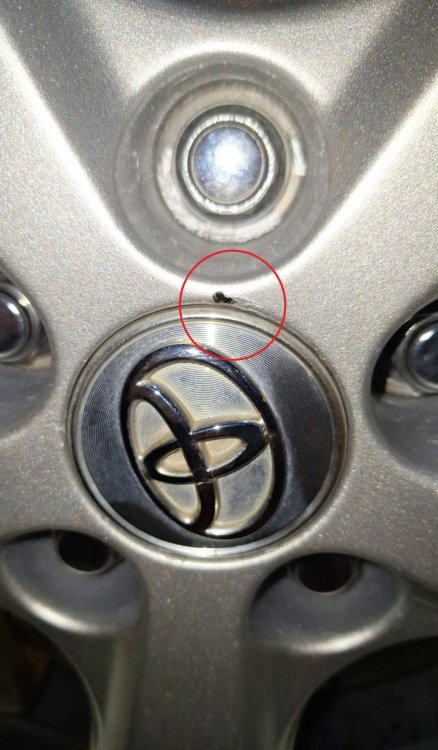
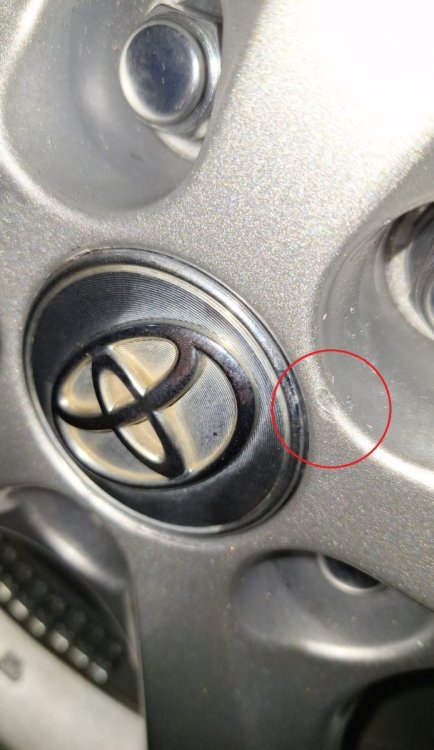
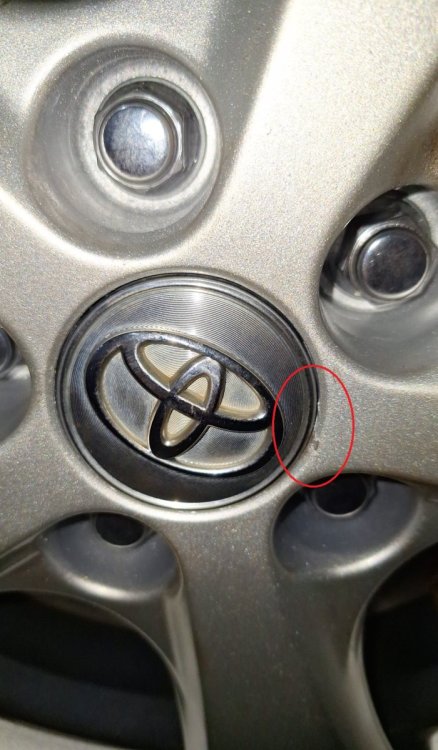
So, I had a set of tyre rims that I bought used - and I decided to send them to a certain tyre workshop that is very, very popular with PHV drivers. What was supposed to be a very simple tyre change job turned out to be a great disappointment. I did not inspect the tyres in much detail after the job was done. until I got home. Since my rims had been repaired and repainted before I sent in the rims for the tyre job, the surface was flawless, and any form of poor worksmanship were immediately apparent to see, starting with this: Now these scuff marks - make as you will how they surfaced onto the rims, but I didn't really bother so much about it, until I saw the next 4 images: 4 gouges into the rim, all at the same spot. Now before you bash me - note that I do understand that empty tyre rims need to be balanced on the machine after mounting a fresh set of tyres. And I had passed the empty rims to the tyre shop with the center caps in a SEPARATE bag - just like my 1st picture. But what I did not expect was that the 4 gouges where the paint layers came off - were all IN THE SAME SPOT. I mean, how does that happen? When the mech working on the tyre sees the 1st mark being made on the rims with the fresh coat of paint, you'd think he would be a bit more careful with the 2nd rim... But no! The 2nd rim - same gouge being made! And the 3rd rim! BAM! ONE MORE FOR YOU SIR! And the 4th rim! POW! HAHA THERE YOU GO! NOW ALL FOUR RIMS BEAR THE SAME MARK FROM ME, THE ALMIGHTY TYRE MECHANIC! And then, when I inspected the tyres that I had gotten, I was dumbstruck when I saw the below: 4 tyres, each from a different week of the year, and the oldest being 04/23 vs the newest 41/23? Again, how the hell does this sort of thing happen? Does every customer come in and buy only 1 single piece of tyre? Or is it that the tyre mech DGAF when he took the tyres out from the warehouse? Again, I can understand if it's 2+2 or 3+1, or 4 tyres just barely a week apart of each other... but this is really a first for me. Also, mind you, I did not go for their "flagship product", so don't tell me "you paid peanuts, so you must get monkeys". I had instead opted for something more "branded" (anyway, my photos already give a hint of what brand the tyres are). ---------- Conclusion: Am I asking for too much from this tyre workshop? Or any tyre workshop for that matter? Any comments and opinions are welcome. Thanks for reading my post and hearing out my experience.


-
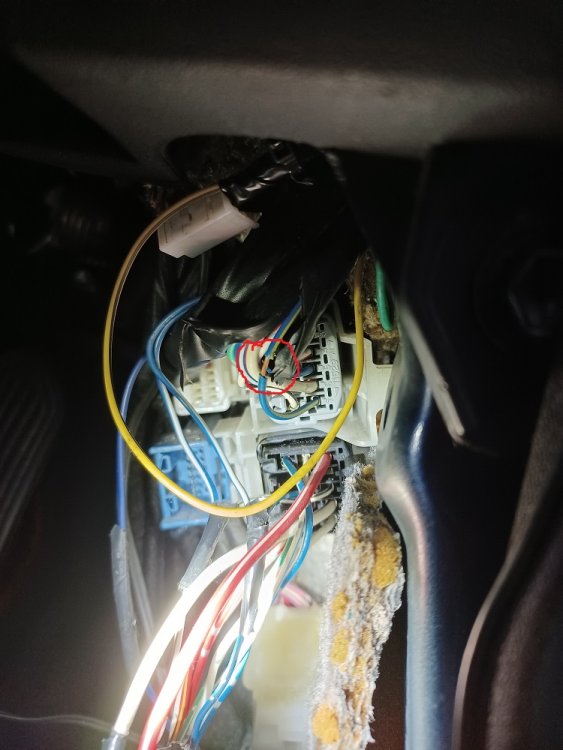
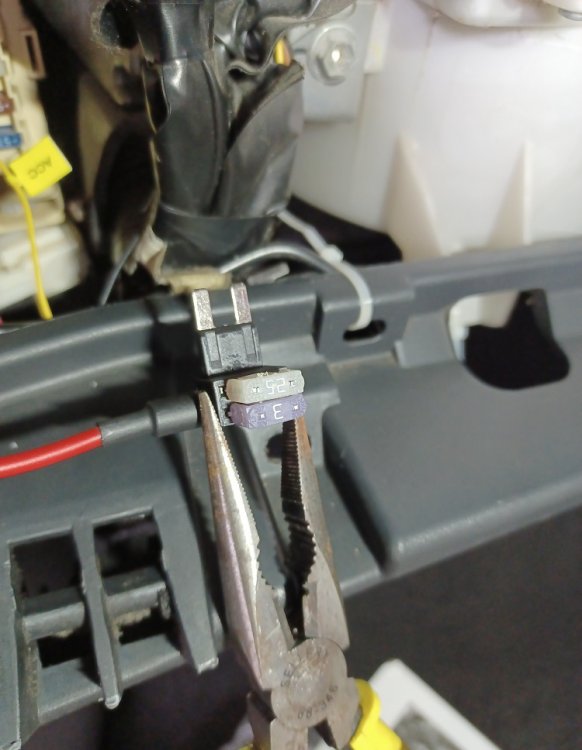
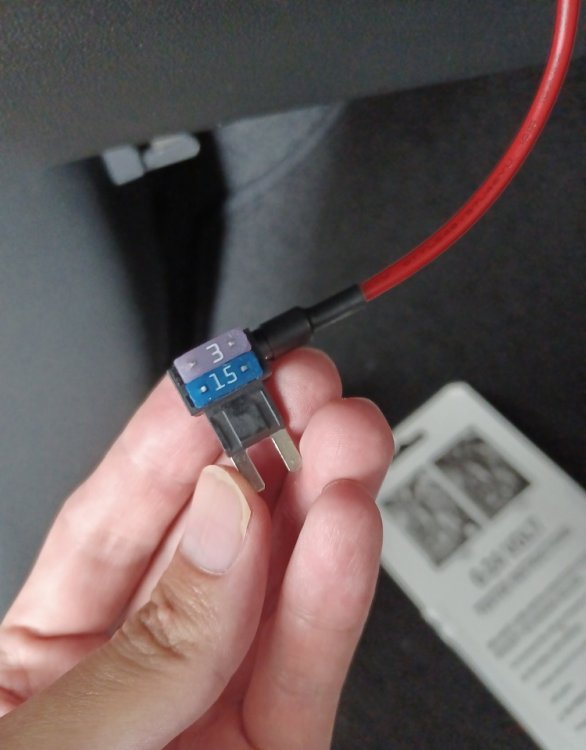
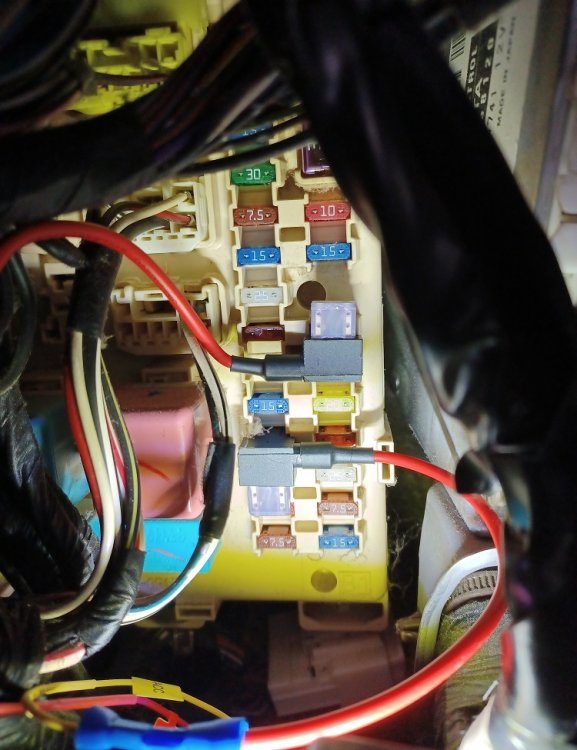
 Had been meaning to do a short write up to share my experience when I did a DIY installation/replacement of my old 2-channel dashcam (front and rear) with a new 2-channel dashcam, and also to rant about the shitty worksmanship that I got from the "professional" workshop that did my previous dashcam installation. I had read up quite a bit on DIY installation of dashcam before deciding to take the plunge, and boy did I learn a lot from it! Dismantling the Old Dashcam So I started from the rear camera, and start ed pulling the wires out from the head liner. My fuse box is on the left side of the front passenger car seat - I had checked this out in advance and was ready to install the new dashcam to draw power from this fuse box. #1. Started pulling out the old wires, and when I saw the wires going towards the driver's side (right side), I started to have a bad feeling about the old installation... #2. As I slowly pulled the wires out from the rear of the car to the front, I saw that the wires were being stuffed into the headliner in front of the plastic clips, with the plastic clips pressing onto the wires and creating a kink in the wires: #3. So I continued pulling and eventually revealed the excess wire - which was bundled into a messy bunch of spaghetti and haphazardly taped together... and shoved behind the kick panel at the pedals: #4. Eventually when I tried to disconnect the electrical wires for my old dashcam, I saw that it was tapped into an existing spliced-open electrical wire: Opening up the electrical tape, I saw that the wire was just twisted and mashed up onto the existing wire... ... and that splice was done just a few centimeters away from an adaptor that plugs into the socket! (wtf!?) #5. Then tracing the wire back down the line towards the camera... I noticed that one of the wires from the old dashcam (circled yellow) was spliced onto an existing already-spliced wire (circled red)! (WHAT THE F!@#?) Eventually I got all the wires dismantled. And then sealed up all the splices so as not to short out the other electrical components. Installing the New Dashcam I initially thought I could reuse the route that the old dashcam installation had taken to the front of the car - but unfortunately I had to carve myself a new route from the rear of my vehicle to the front fuse box I started from the back of the car, and routed the wiring cleanly towards the front: Ran the wires up the A-pillar and threaded all wires behind any plastic clips so they wouldn't get snagged or get kinked when the headliners are smacked back into place. Now here's the fun part - in all the research that I did online via website and YouTube tutorials, not one of these guides/tutorials suggested splicing open existing electrical wires in order to supply power into the new dashcam. It's either: 1) Use the cigarette lighter port - i.e. plug the dashcam into the USB/cigarette lighter port, OR 2) Make use of fuse taps (like the ones below) and tap into the car's internal fuse box (not the engine fuse box!) I needed to have parking power enabled for my dashcam, so I used a 12V tester and tested out all the fuses in my fuse box to see which one I could make use of. Eventually I settled for the constant power fuse serving the Door lights (25A) - the camera needed only 2.4A so I put in a 3A fuse: ACC power was 15A, so again, that stayed the same and I put in a 3A fuse for the new dashcam: The final installation looked definitely a lot better than the old installation job: Afterthoughts I truly wonder what the f@#$ I had paid for when I went to the "professional" workshop to install my old dashcam - I had paid a labour fee for it back then($50), and truly was not expecting this kind of half-baked job that spliced into any open/live electrical wire without any thought given to it. I did not go and trace which existing live wires the workshop had tapped into (ABS? Airbags? ECU?) - I guess it's a moot point to go after such things at this point in time. And for those guys who leave reviews saying the workshop they went to install their dashcam (or any other electrical components) is "Very good! Top notch service!" - is it REALLY good worksmanship that they provided? Or is all the horror revealed when you pop open that kick panel? Just sharing my experience that it seems a faraway dream to expect a workshop to do up such installations in the correct and proper way... Also, in the recent wake of increasing reports of cars catching fire all of a sudden - is it really surprising? To me, not really. I have been to several workshops for electrical issues or installation of electric components, and each one did wiring in exactly the manner as I described above - splicing open any live wire without bothering where it comes from, or where it leads to. Sorry for the long post with the heavy use of images. Thanks for reading, and feel free to share your experiences. Stay safe everyone! Have a good week ahead!


- 18 replies
-
- 16
-

-
Bought the Anova precision cooker during Black Friday for lazy woman steaks. Was only USD$99 + $20+ shipping, arrived over the weekend. Ordered from their American site but it was shipped from Hong Kong though. It has a Singapore compatible plug. Faster ran to Foodie Market at Katong to buy me some meat! 1.5inch ribeye (sorry didn't notice pic blur when I took it) 3/4 inch A4 wagyu Started with the ribeye first. A sea salt and fresh ground pepper rub. Let it sit for awhile and added rosemary and thyme. Into the bag (provided with the machine) with a clove of garlic. Throw into the pot and just wait! Bonus pic: "Mama, you cooking? Will I get some? I am a good boy!" 2 hours later.... success!


- 123 replies
-
- 13
-
-
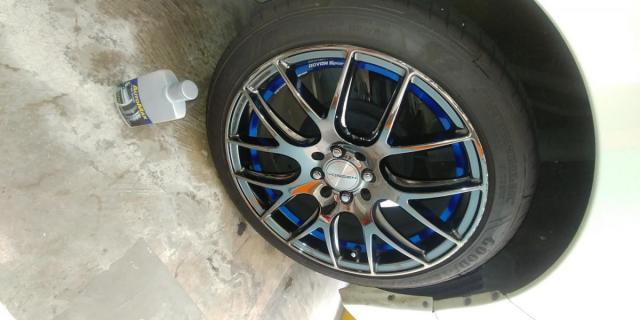
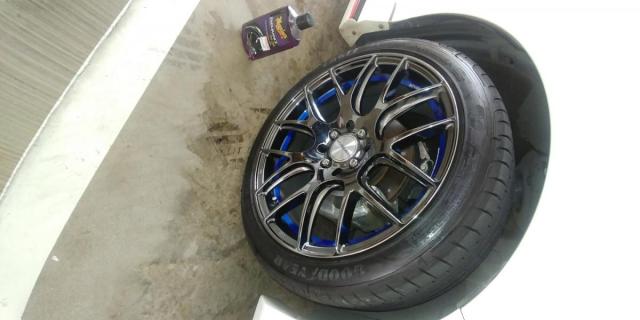
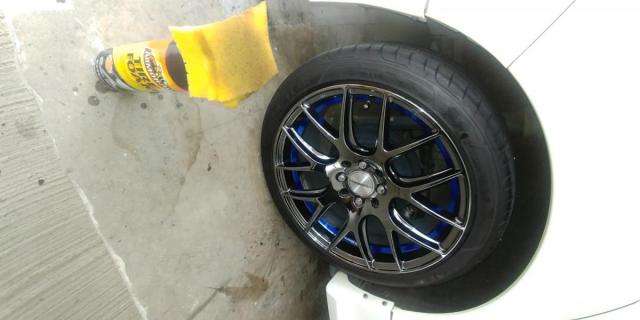
Bought some tyre shine products a while back and finally got my lazy bones to work and washed the car myself. Since I was washing, decided to do some experiment for the products i bought. Below are the pics of each of the products used on each tyre. All tyres are given 2 coats of the products and see which lasts longer and maintain its shine. Feel free to comment on the experiment so that I can do better in future experiments. The photos doesnt do justice to the shine. It actually is shiny but i cannot seem to take a photo to bring out the shine. I'll report the daily shine status of each tyres and see what are the results. As of now, in order of most shiny; 1) AG 2) MG 3) AM 4) AF

- 66 replies
-
- 10
-
-
- tyre shine
- experiment
- (and 3 more)
-
Hi hi, My wall hanging shoe rack is like dropping off from the wall soon cos the gap between the cabinet and the wall is getting huge till the sealant have been torn off from the wall. The shoe rack is quite huge (7' x 2.5') but I saw it is only fastened by 8 screws to the wall (4 top and 4 bottom)... and our HDB wall bricks are quite hollow, the screws and wall plug might get loosened over time. Question : How do I add in additional screws to tightened the cabinet back to the wall? I saw carpenter usually use those long screws that have a white color wall plug attached to it. What do you call those screws? Do I need to use a wood drill bits to drill the cabinet till it reaches the wall and then continue with a concrete drill bit OR can I just use a concrete drill bit to drill the cabinet all the way into the wall, then plug in the screw with wall plug? What size of the drill bit and the screw with wall plug should I look for (length x width) ? Thanks for the DIY guru here.
-
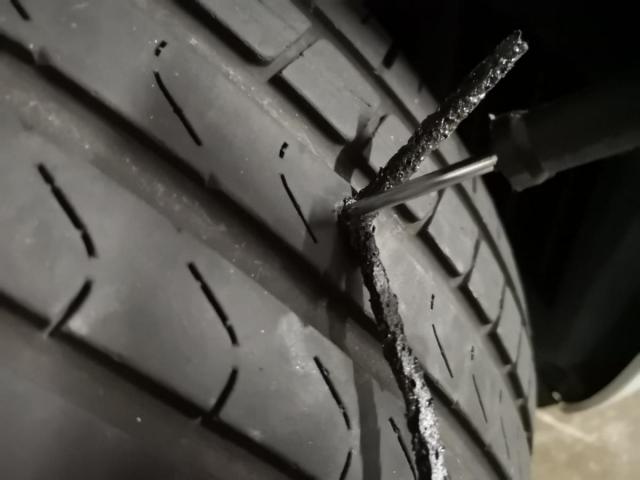
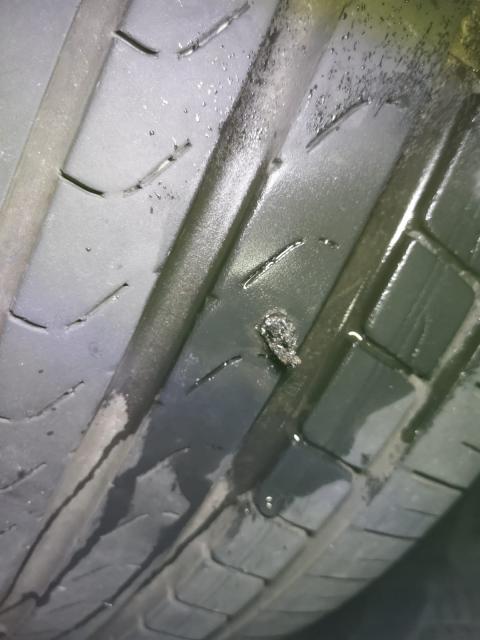
Coming back home last night the car tyre monitoring system indicated a leak in front R tyre. Checked it out upon reaching home and indeed discovered a nail. 1. Extracted the nail out with an orange pliers. 2. Plug in a round file to smoothen and enlarge the hole. 3. Standby the sticky worm inserted into the needle eyes. 4. Insert into the hole with some force, with about 3/4 way in and pulled it out quickly. 5. Spray some water or bubbled one to check for leak. I pumped up the tyre a bit with a portable inflatable pump and drove to a petrol kiosk to fully inflate the tyres and do a reset on the tyre monitoring system. Do note that I am on RFT and hence could drive back home. Non RFT tyre should find a safe place to stop immediately and proceed to mend the tyre. Lucky me it was the front tyre, might need to take it off if it was at the rear which would restrict the hand movements. Fun, yes, Satisfaction, oh yes.


- 166 replies
-
- 24
-
-
 Hi DIY detailing peeps !! From Paint Correction to Regular Interior & Exterior Wash, What are some products/tools you guys use ? Lifehacks?😁 Been trying to "detail" myself for this year or so, here is my experience in condo basement carpark !! Any advice from more experienced bros are greatly appreciated !! Power socket : Yes (Although im not sure if its allowed to be used lol) Water Supply : Plain old tap with bucket (cant connect hose...) Pressure Washer : Worx Hydroshot 20v - Honestly the Worx HS is fine, but abit greedy for more power, especially for use with foam cannon. Tried diluting HS Foam dispenser for 1:5, half the car always finish... like waste - considering Karcher K5 Full Control & MJJC Foam Cannon !! (although i better check the usage of power socket with condo MA)... - Rinse , Foam & 2 Bucket with Mitt 😉 Polisher : Makita 9237C Rotary (Any bros interested to buy over, let me know !! used 2 times lol) - Tried doing by car hood, quite like the outcome... But honestly i gave up doing it myself for Paint Correction - Wah... but me doing in condo basement... its like got echoes... So loud !! Smooth power though... and my stamina got to me after 1 hood... lol - Dont mind trying DA, But seems so expensive !! Seen the FLex one Auto Maxima selling for $1400.... Also considered the Megs DA Powerdrill thingy.. but replacement pads seem like an issue - End up the next few days did part by part by hand... use the Makita neighbours all see me like zoo animal !! Products (Shampoo, Polish, Wax, Compound, Towels) : - Megs Wash & Wax Shampoo (in Worx HS) , Autoglym SRP, 3M Rubbing Compound, Megs Ultimate Compound, Soft 99 Wax (S99 wax makes my finger smell for the whole damn day !!) Megs All Wheel Cleaner, Megs Interior Detailer, Megs Ultimate Quik Detailer - Am personally a fan of Meguiar's stuff.. Tried Armorall is meh... Dont mind trying Turtle Wax, Adams, Sonax, Autoglym and especially Chemical Guys !! (Although Adams, CG seems quite rare & expensive in SG) Interior Trim : Currently using a makeup brush to brush the dust together with my Dyson V11... Once in awhile Brush in Dettol diluted Antiseptic (yes no joke) and wipe with MF towel.. Thinking to Invest in Wet & Dry Vac like Karcher WD3 to suck up all the solution and dust !!😆 Also, Considering a Karcher SC2 for better faster better cleaning, and can use in the house too !! Finish off with Megs Interior Detailer !! Leather : Vacuum crevices, Brush leather&vinyl cleaner with shoe brush, Wipe with MF, Wipe again with Dettol, Finish with Megs Int Detailer... Carpets : Vacuuuum all the way.... once awhile brush stuborrn stuff.... Wanna get a drill brush with Carpet Cleaner to Brush in and Suck out with W&D Vac !! Thanks for reading till this point if you made it 😉 Any advice is appreciated... Share your favourite Techniques and Products too !! Till then, Drive safe...
 -
Anyone DIY? Brought a thrttle body cleaner at Mr DIY, loosen the air duct, ask my kid to step on the accelrator when I on the igition swtich without starting the car. Open the e throttle, use a rag, spray the cleaner and clean it... Less than 10 mins job, spend less than $5. Remove battery terminal and reset the ECU, and start cleaning the battery terminals using steel brushes. Apply copper grease on the terminal and connect it back. Required Materials for this How to Clean a Throttle Body ProjectHere’s a list. Paper towels or rags Throttle body cleaner Gloves
- 13 replies
-
- 4
-
-
- throttle body
- cleaning
- (and 3 more)
-
I recently DIY installed a set of spacers for my car. Thought I share with you guys the process. Hopefully this can help those of you keen to install wheel spacers yourself. Why I did not choose to pay a small amount of money and save myself the hassle of the DIY? Well, after researching on the proper installation of spacers, there are a few reasons why I think DIY will be better compared to workshop installation: 1) Proper application of anti-seize copper grease to the right surface and not to accidentally get these into thread grooves. 2) Tightening of the bolts need to be in "Star" shaped pattern sequence to ensure the spacer and wheels are aligned properly 3) After 150km of travel, will need to remove the wheels to retighten the bolts. 4) Need to use torque wrench to tighten to the factory specification. In my case is 150nm. I shall span this tutorial over a few thread posts for clarity in presentation. First up, a pictorial video guide.
- 32 replies
-
- 24
-
-
- wheel spacer
- spacer
- (and 5 more)
-
Hi bros,,, Anyone purchased for custom mixed spray can paint (to match your car colour code) Locally? a friend of mine from US told me that it is commonly done and widely available there, but in SG totally no news. Or DIYers that spray paint, touchup/repair paint yourself, what method do you guys use to DIY paint your car ? Maybe invest in airbrush and buy small amts of paint from Paint shop? Want to touch up & spray up some parts of my car, but touchup paints not doing too well cuz the area is about 3"x3" Thanks in advance !!!!
-
My kitchen drawer is no more soft closing now, and I think the slide mechanism spoils. Usually the slide is installed at the side of the drawer, but mine is under it. Anyone know where can I find the replacement? I tried to put the entire drawer out to inspect, but it can't be removed. Please share and guide if you have DIY before. Thank you.


-
Hardware chain Home-Fix is closing all its retail stores in Singapore https://www.asiaone.com/singapore/hardware-chain-home-fix-closing-all-its-retail-stores-singapore?utm_medium=Social&utm_source=Facebook#Echobox=1576062358 Another one bites the dust Right after Sasa Have been patronising MR DIY at JB instead Now SG there's MR DIY too so it's the inevitable
-
 DIY Motorcycle Parking Spaces Seen In Woodlands Void Deck, Town Council Investigating source: https://mustsharenews.com/diy-motorcycle-parking-spaces/ DIY Motorcycle Parking Spaces Allegedly Created By Biker Group Who Also Spray-Paint Rims There Every motorist would be familiar with the agony of not being able to find a carpark space. While most of us would simply wait for a lot to be vacated, or seek alternatives elsewhere, a bunch of motorcyclists apparently decided to DIY their own parking spaces. On Tuesday (25 Aug), a series of pictures were uploaded on the SG Road Vigilante Facebook group, showing the “DIY” demarcated lots in the void deck of an HDB block in Woodlands. Makeshift lots created with masking tape According to the post, the handmade lots were found at the void deck of Block 899A, Woodlands Drive 50. The makeshift lots appear to be marked by pieces of masking tape. 2 motorbikes were seen parked inside these DIY lots, while another was parked outside the perimeter. The space on the left is also labelled with an “A”, while the one on the right has a “H”. It’s uncertain what the letters stand for. Allegedly the work of biking group One might be tempted to think that they were the pranks of children, but apparently, they were the work of a bunch of motorcyclists. The contributor managed to capture a picture of a group gathering at the void deck. They were allegedly decorating the walls and switch room nearby. The contributor also claimed that the riders would spray-paint their rims at the area, and leave behind unsightly marks on the floor. The motorcycles’ exhausts are also extremely loud, and would disturb residents living nearby. Town Council didn’t see any white tapes However, when queried by MS News, the Marsiling-Yew Tee Town Council shared that its officers had visited the location earlier on Tuesday (25 Aug), but did not spot any white tapes on the floor. They will continue to monitor the situation, it said. From a search on Google Maps by MS News, we found out that there’s a multi-storey carpark just next to the block. It’s thus unclear why anyone would want to create DIY parking spaces nearby. Think, not park outside the box While thinking outside the box would be, under most circumstances, something praiseworthy, taking it literally and flouting parking rules blantantly is clearly something that’s not acceptable. Not only is it inconsiderate to residents, it’s also a safety hazard. If a bunch of people are indeed doing so, we hope the relevant authorities would take action ASAP to put a stop to it.
 -
Have some old (5 years old) sticky residue from double sided tape on my front door (zzz leftover from 5 years ago when i used double sided tape for CNY decorations). I tried to remove it back then but then procrastinated cos i was busy then. Then haha now it's 5 years on. Scrapping it doesn't work cos it's just a very thin residue that u can see and hardly feel. It's the usual laminated type of door. Anyway to remove it without damaging the laminate? Other than Rubbing alcohol, any other suggestions?
- 86 replies
-
- 3
-
.png)
-
- sticky residue
- diy
- (and 1 more)
-
Good Day People, Just sharing... https://www.google.com.sg/search?q=sticker+bomb+car&dcr=0&sxsrf=ACYBGNQMV8y4L2qFbX2CwD67YRrfJ8_I6g:1574912008306&source=lnms&tbm=isch&sa=X&ved=2ahUKEwi31bq2_IvmAhUOOSsKHU4OADkQ_AUoAXoECA0QAw&biw=1366&bih=654 Just a random thought of using sticker bombs for a) Scratch body panels b) Car interior Perks of doing includes a) covering scratch in a cost effective way. Though may need to apply clear coat protection to prevent sticker fly away or faded. b) Spruce up interior in a unique way Cons includes a) Messy looks b) If need desticker is maybe alot of sticky residue Me personally is thinking of trying to cover some unsightly scratches on left and right fenders of the car.
-
Dear All, I have just came across an advert from Facebook on this brand call Color N Drive. Seems like the paint touch up product is good and easy to use. Any bros have heard and use before? Please advise and review. Thanks. colorndrive.com/en
-
Here is a very successful DIY project - leather wrap ( or Alcantera ) on steering wheel. The wrap is customised for each specific model of steering wheel, and they provide all necessary items required for the DIY, which is a rather nice feature . There shall be no mention of what seller since this post is to show you how easy to DIY your steering wrap. If you are good at hands-on, do consider this option instead of paying hundreds to shops instead. https://www.youtube.com/watch?v=_xU_IvxSN2A
-
i am looking to restart my ICE DIY again... since the old ice forums sgsoundsystem die out, anyone knows if there are still any general active ICE forums in SG? or is mycarforum the only general one left? now everyone separated, so lets see if we can re-start. i know Bobcat recently appointed Emma Judge. there is still ICE competitions, but very very low key already. lets see, i got Pioneer P99RS ready for 3 way active. 3 way component speakers ??? No Dyn esotar ok, something basic to start with. maybe Rainbow 3 way my fav. 6 chn power amp ??? hmm looking at JL audio XDv2 or good ole Audison LRx6.9
-
I got a piece of those furry carpet at home, stained by my doggies pee. i have tried to spray Febreze to wipe and clean it but still have the pee smell. how do I do a proper cleaning? are those steam cleaner helps? any place I can send it for cleaning? thanks
-
Where can one get a scan tool in local shops or local sellers. Like tis for example Schwaben Professional Scan Tools
-
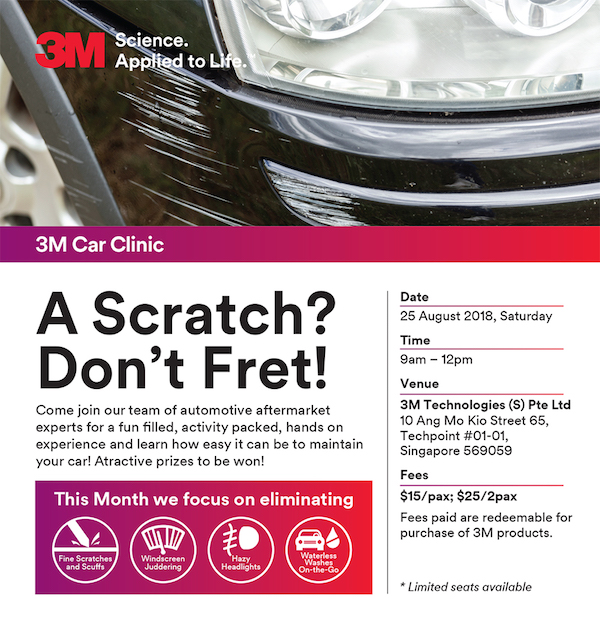
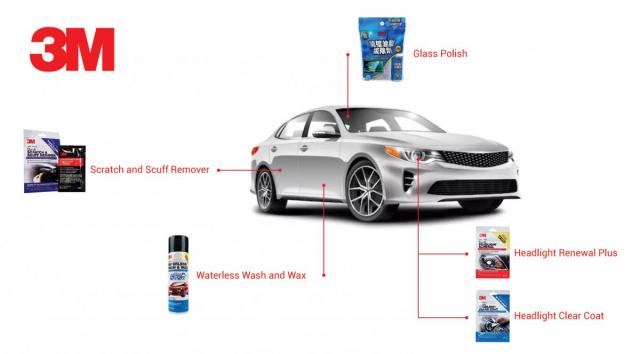
A lot of time, you might be thinking to yourself that should you seek help with the professional when it comes to repairs and remedy. But sometimes, even seeking help can be time-consuming and wallet unfriendly! MCF Hangout with 3M - 25 Aug 2018 Luckily! We have met 3M and we are working together with MCF to organise an MCF HangOut to educate you guys on quick fixes to a number of problems you might face during your tenure of driving. These quick-fix doesn't require you to seek for professional assistance as 3M design and formulated the products into DIY packs and it is in a single-use packaging. Meaning you will not store these items at your home once you have resolved the problem (COME JOIN US FOR THIS MCF HANGOUT AND STAND A CHANCE TO WIN EXCITING PRIZES FROM 3M!) Car owners around the world trust 3M for cutting edge automotive solutions. For over 100 years of automotive science and innovation, 3M has developed products that are easy to use, affordable and do the job. Auto body fillers, adhesives, cleaners, waxes and polishes are just a few of the 400 products they carry for car enthusiasts, restorers, and do-it-yourselfers. Hands on and learn how to solve some of the tricky problems from 3M Auto Care. Be involved and work on some problems with the correct products and you can do it yourself! We are also looking for 5 members' car to become the demo car during the event! We are looking for cars that have hairline scratches and you wish that it can be removed. Members can also take this opportunity to wash car on site with your partners! We will be sharing with you on proper washing technique where you can prevent your car from damages. We are now looking out for 20 members (plus partners) to come and join us for this event! And here's the programme! 0900 – Registration start 0930 – Event Start – Opening Speech by 3M Singapore 1000 – Car Clinic – Prep Wash with Clay Bar 1030 – Car Clinic – Identifying and removing Scratches, Headlight Renewal and On the go cleaning 1145 – Tea break 1200 – Giveaway quizzes, Win attractive prizes 1215 – Group Photos /Tea & Refreshments/ Pop Up Shopping Registration Closed

-
How to SUPER CLEAN your Engine Bay https://www.youtube.com/watch?v=PRSoRkM8GcM
- 7 replies
-
- 3
-
-
- engine bay
- clean engine
- (and 5 more)
-
https://www.youtube.com/watch?v=BTDnjimqrYY Very simple DIY 1. Clean with #1 Wet packet 2. Clean with #2 Dry packet 3. Prime with supplied primer packet ( if provided ) 4. Stick lower lip onto underside 5. Secure with screw 6. Sit back and admire.
-
Due to an injury when I step on a nail in the old past, now the bone on one side of my heel hurts badly when I walk. I am thinking about creating my custom insole and embed a wood support around the injured bone. I experimented with some wood cut-out and it worked. I can make wood part but I can't find good materials which I can create main part of the insole and a normal matching part for opposite foot. Assume I want to make custom insoles, what kind of materials I can find and where? I think folks in a car forum would have more knowledge in hardware and do-it-yourself ideas.